


'%3e%3cpath%20d='M17.5%208.75C17.5%2013.58%2013.58%2017.5%208.75%2017.5C3.92%2017.5%200%2013.58%200%208.75C0%203.92%203.92%200%208.75%200C13.58%200%2017.5%203.92%2017.5%208.75Z'%20fill='%23F56708'/%3e%3cpath%20d='M13.2123%2010.85H12.7048C11.9698%2012.915%2011.5498%2013.125%2010.4473%2013.125H8.22482C7.62982%2013.125%207.27982%2012.8275%207.27982%2012.215V9.065C10.1498%209.065%2010.0098%208.9425%2010.3248%2010.535H10.9023C10.8848%209.9925%2010.8673%209.205%2010.8673%208.6975C10.8673%208.2075%2010.8848%207.4375%2010.9373%206.79H10.3598C10.0448%208.4875%2010.2023%208.33%207.29732%208.3475V4.6025C7.29732%204.4275%207.34982%204.375%207.52482%204.375H10.6573C11.3573%204.375%2011.6898%204.83%2012.0398%206.475H12.5823L12.7573%203.5C11.3748%203.64%2010.4123%203.64%208.73232%203.64C7.03482%203.64%205.59982%203.6225%204.00732%203.5525V4.235C5.26732%204.375%205.40732%204.55%205.42482%205.11C5.45982%205.88%205.47732%207.42%205.47732%208.715C5.47732%2010.0275%205.47732%2011.585%205.44232%2012.3725C5.40732%2012.9325%205.28482%2013.1075%204.02482%2013.2475V13.93C4.75982%2013.8775%206.64982%2013.86%208.36482%2013.86C8.97732%2013.86%2010.1498%2013.825%2012.8623%2013.93L13.2123%2010.85Z'%20fill='white'/%3e%3c/g%3e%3cdefs%3e%3cclipPath%20id='clip0_2416_2431'%3e%3crect%20width='17.5'%20height='17.5'%20fill='white'/%3e%3c/clipPath%3e%3c/defs%3e%3c/svg%3e)
%20scale(1.1)'%20fill='%23FFFFFF'%3e%3cpath%20d='M22.655%208.719c-1.802-1.801-4.726-1.801-6.564%200l-7.351%207.35c-.45.45-.45%201.2%200%201.65.45.449%201.2.449%201.65%200l7.351-7.351c.899-.899%202.362-.899%203.264%200%20.9.9.9%202.364%200%203.264l-7.239%207.239c.9.899%202.362.899%203.263%200l5.589-5.589c1.836-1.838%201.836-4.763.037-6.563zm-2.475%202.437c-.451-.45-1.201-.45-1.65%200l-7.354%207.389c-.9.899-2.361.899-3.262%200-.45-.45-1.2-.45-1.65%200s-.45%201.2%200%201.649c1.801%201.801%204.726%201.801%206.564%200l7.351-7.35c.449-.487.449-1.239.001-1.688zm-2.439-7.35c-1.801-1.801-4.726-1.801-6.564%200l-7.351%207.351c-.45.449-.45%201.199%200%201.649s1.2.45%201.65%200l7.395-7.351c.9-.899%202.371-.899%203.27%200%20.451.45%201.201.45%201.65%200%20.421-.487.421-1.199-.029-1.649h-.021zm-2.475%202.437c-.45-.45-1.2-.45-1.65%200l-7.351%207.389c-.899.9-2.363.9-3.265%200-.9-.899-.9-2.363%200-3.264l7.239-7.239c-.9-.9-2.362-.9-3.263%200L1.35%208.719c-1.8%201.8-1.8%204.725%200%206.563%201.801%201.801%204.725%201.801%206.564%200l7.35-7.351c.451-.488.451-1.238%200-1.688h.002z'/%3e%3c/g%3e%3c/svg%3e)

Blog /
Set Up Payments & Checkout
Set Up Payments & Checkout
 Louie · June 08, 2026
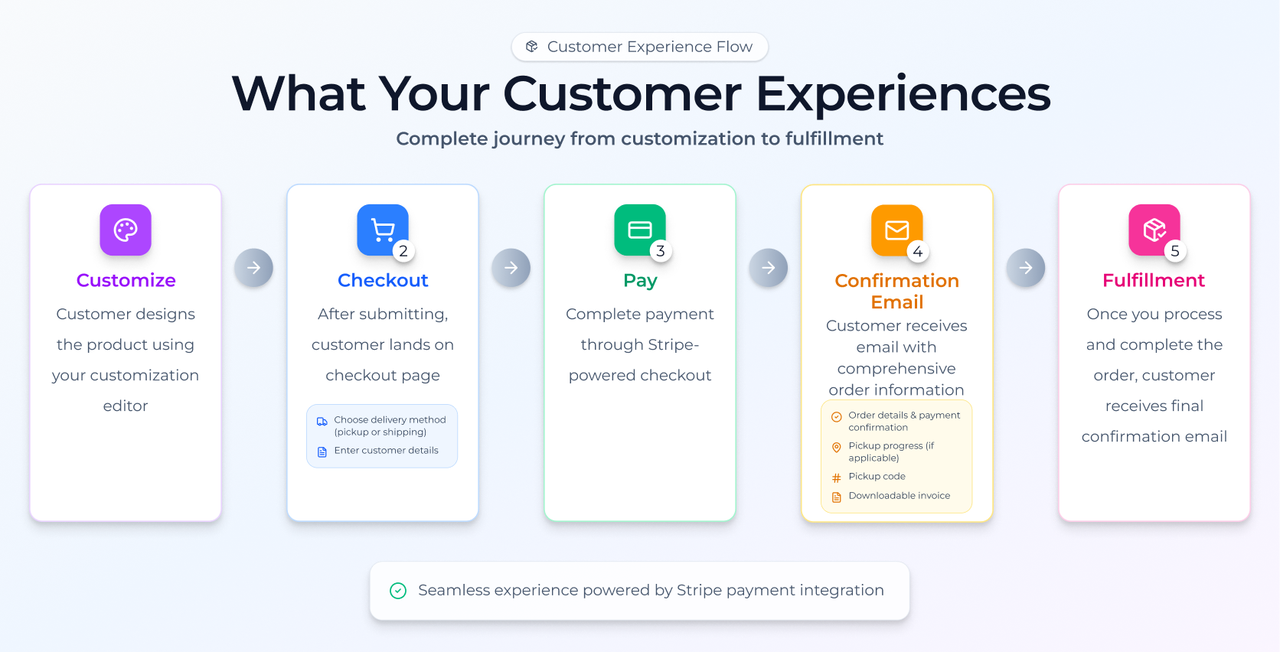
Set Up Payments & Checkout
Accept payments directly in your Customthings store — no Shopify or third-party checkout needed. Perfect for in-person events, social media orders, and anyone who wants a complete customize-to-pay experience.
Why Use Customthings Payments?
Before this feature, customers could customize and submit orders through your Customthings store, but payment happened outside the platform — through Venmo, cash, or a separate invoice.
Now, the entire flow lives in one place: customize → checkout → pay → fulfill.
This is especially valuable if you sell at pop-up stores, craft shows, events, or take orders through social media. Your customers get a real checkout experience, and you don't start production until you've been paid.
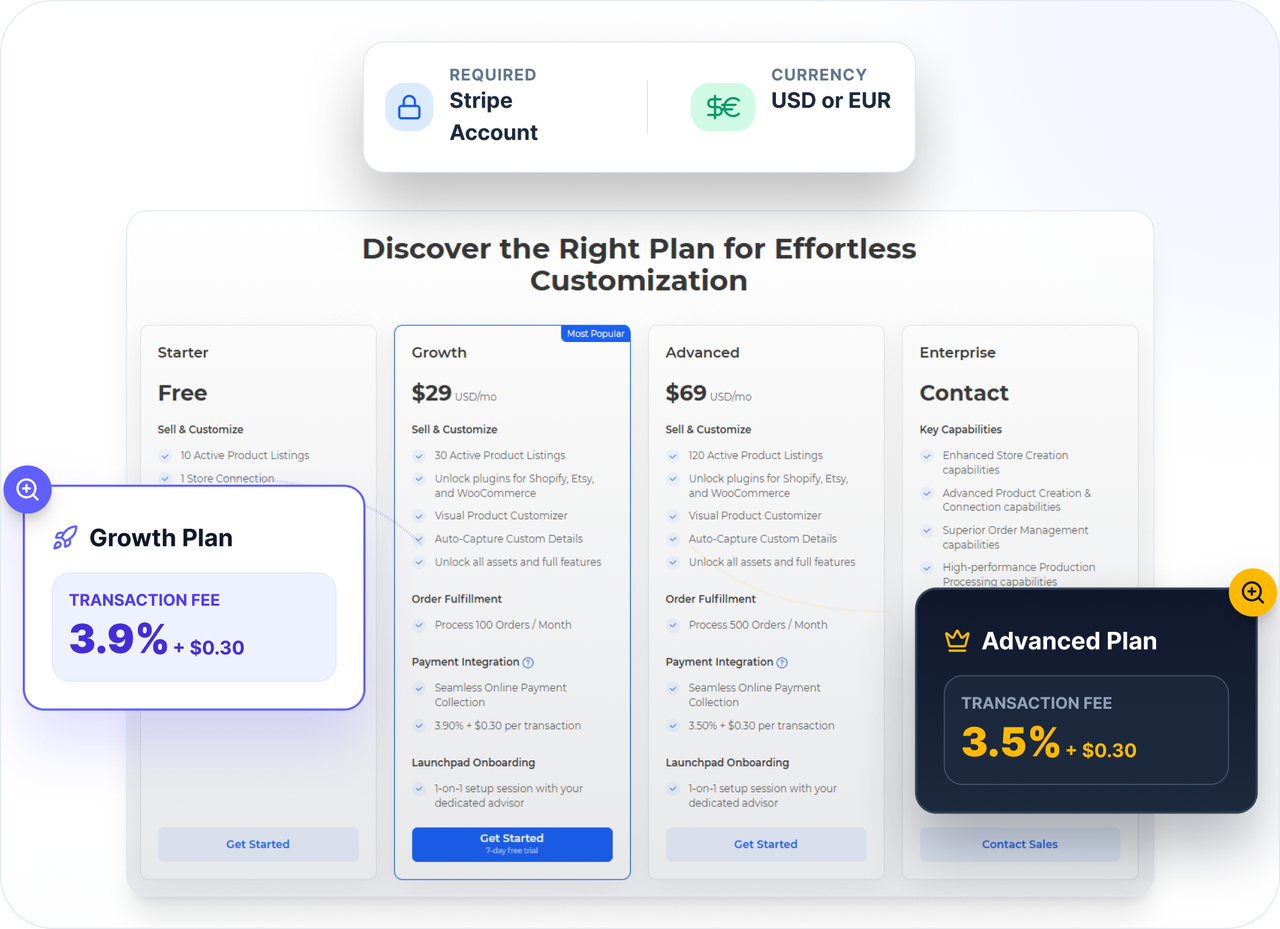
Requirements
- A Growth plan or above (payment is not available on the Starter plan)
- A Stripe account (Customthings uses Stripe as the payment gateway)
- Store currency set to USD or EUR (other currencies are supported for price display only, not for payment processing)
Transaction fee:
- USD 3.9% + $0.30 & EUR 3.90% + €0.25 per transaction for the Growth plan;
- USD 3.5% + $0.30 & EUR 3.50% + €0.25 per transaction for the Advanced plan.
Step 1: Set Your Store Currency
Go to Finance → Payment. Select your store currency — currently USD or EUR for payment-enabled stores.
Important: Once you set the currency here, all product prices across your store will display in that currency. If you change it to an unsupported currency (e.g., AUD), prices will display in that currency but the payment function will be disabled.
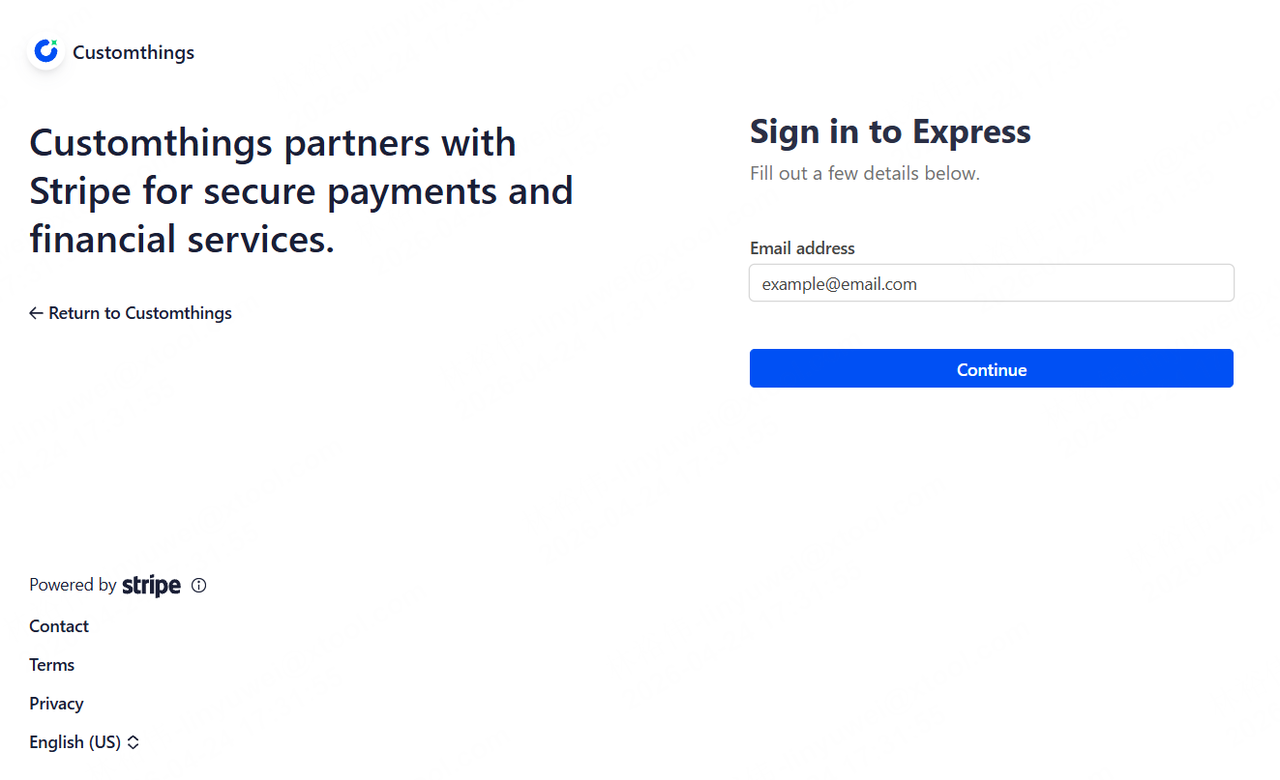
Step 2: Connect Your Stripe Account
Still on the Finance → Payment page, find the Stripe Payment Gateway section and click Connect Stripe Account.

You'll be guided through Stripe's onboarding flow:
- Select your country
- Enter your business and banking details in Stripe's interface
- Complete the connection
Once connected, the Payment page will show your linked account status, your transaction fee rate, and an option to upgrade your plan if needed.
If you need to update your Stripe details later, click Go to Stripe Dashboard from this page to manage your account directly in Stripe. Note that the store currency cannot be changed after connecting.
Step 3: Configure Shipping & Delivery
Go to Settings → Shipping & Delivery. This step is critical — it determines what fulfillment options your customers see. Customthings offers two delivery methods. You can enable one or both:
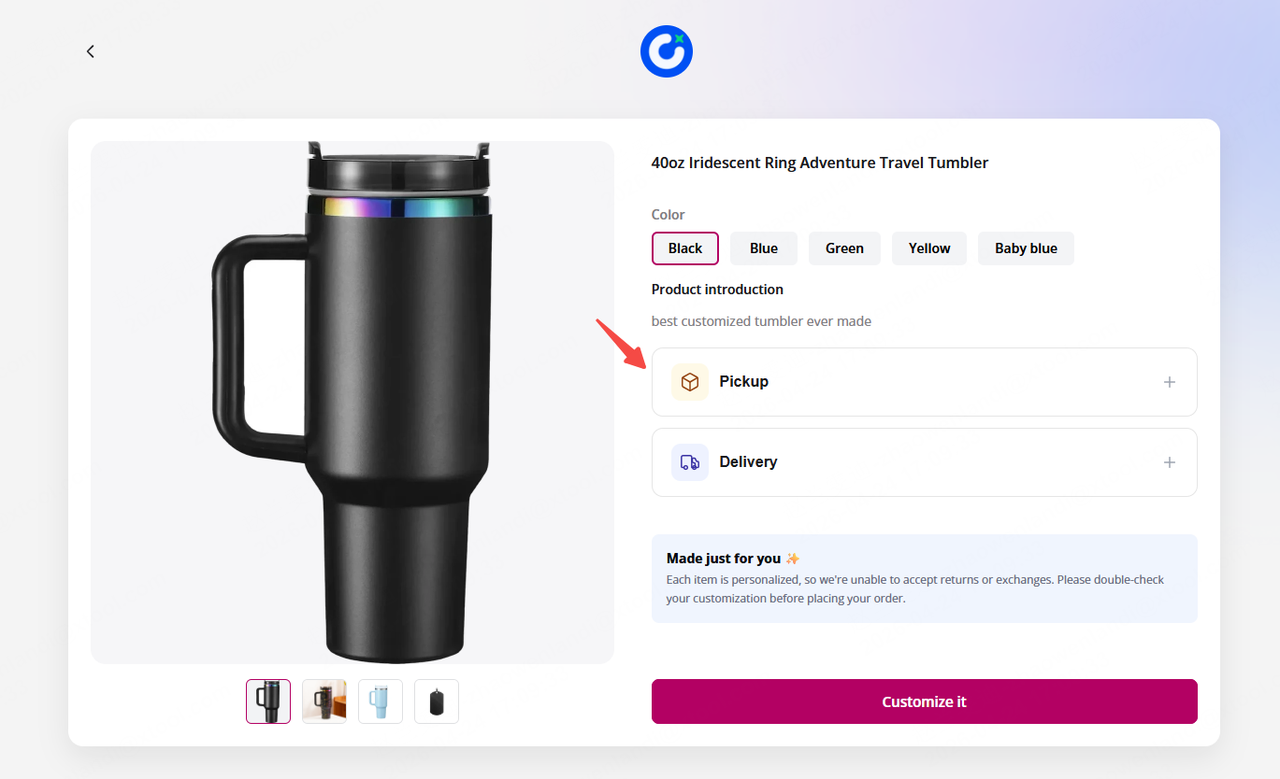
In-Store Pickup
Toggle this on if customers collect orders in person. You can configure:
- Pickup location — your store address or event location
- Pickup hours — when customers can come to pick up
When a customer chooses this option, they receive a pickup code via email after paying. The pickup code stays locked on your end until you mark the order as Processed. Once processed, the order status changes to Awaiting Pickup, and you can verify the customer's code when they arrive.
Online Delivery (Shipping)
Toggle this on if you ship orders. You can configure:
- Shipping regions: add different regions with different shipping rates
- Shipping price: set per-zone pricing
- Free shipping threshold: e.g., free shipping on orders over $50
Click Save changes when done.

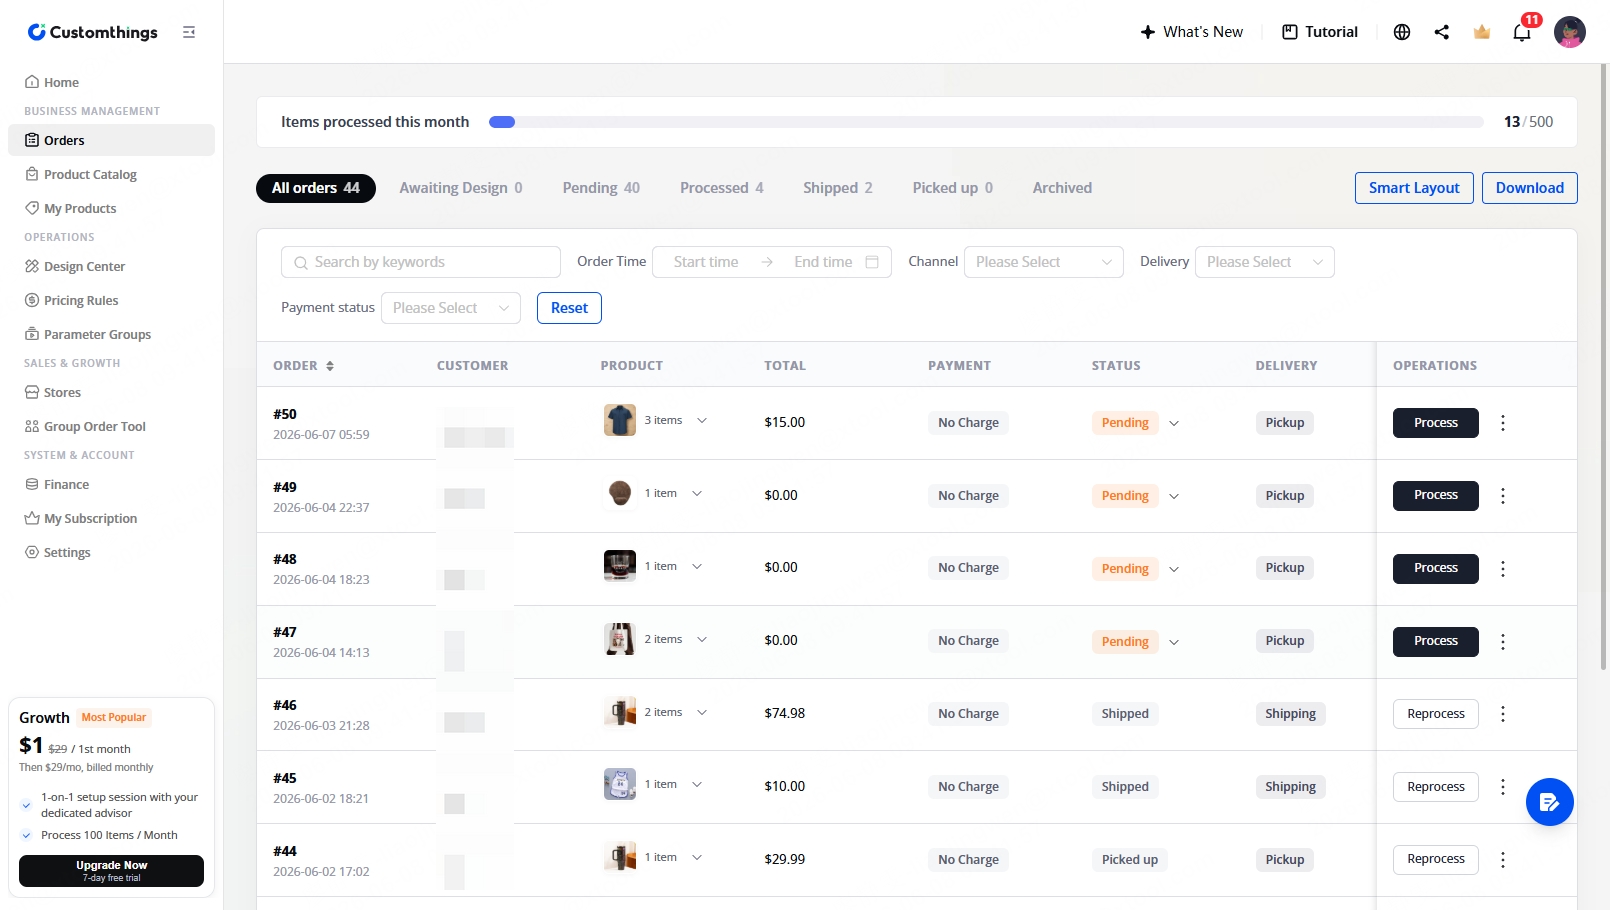
What You See on Your End
When a paid order comes in, your Order dashboard shows:
- Order details and the customer's design file
- Delivery method — pickup or shipping
- Payment status — confirmed as paid
For pickup orders:
- The pickup code is initially locked
- Mark the order as Processed → status changes to Awaiting Pickup and the pickup code becomes active
- When the customer arrives, enter their pickup code to complete Pickup Verification
- The customer receives a final confirmation email

Tips
- Set up shipping & delivery before you share your store. If neither method is configured, customers won't be able to complete checkout.
- Payment works alongside your e-commerce integrations. You can accept payments through your Customthings store for in-person/social orders while still using Shopify or Etsy for your online store.
- The pickup code system is built for in-person events. If you're at a craft show, customers pay on their phone, you get the order instantly, produce it on the spot, and verify pickup — all without cash or card readers.
→ Connect your Stripe account and start collecting payments today!→ Next: Set Up Pricing Rules: learn how to charge differently based on customization complexity